 Do you want to add new images to your website but need some help to resize or edit your photos?
Or have you recently added photos and noticed these common problems?
- Pages are loading slowly.
- Images look stretched or distorted.
- Slideshows are causing the content to move up/down.
When you take a photo with a regular digital camera, it will usually take a large dimension, high resolution photo. This is ideal for printing but the photos are too large for websites. An average camera image will be around 4000 pixels wide x 3000 pixels high. Most photos for your website (e.g. for slideshows) will need to be less than 1000 pixels wide. Although you might be able to tell your website to limit the “display size” of your images, this does not solve the problems. You need to actually decrease the size of the image file itself to avoid slow page loads and the other adverse effects.
There are many available free and paid photo editing tools. In reading various “Top-10” photo editing reviews, the Pixlr tool is often mentioned in the top 3 of these lists (many times the first or second option is a paid tool). We have selected Pixlr to use in these instructions, but most photo editing tools provide similar basic capabilities.
Pixlr Express is a beginner-friendly online photo editor. It is a free web-based solution that can assist you with basic photo editing (Resize & Crop), enhancing your photos (Red Eye, Auto Fix, Sharpen) and providing other optional creative editing tools that you can experiment with (Borders & Image Effects). There is nothing to download or install, it just runs in your web browser like any other website.
Although these instructions can be used to prepare any images for a website, the below instructions provide an example of how to prepare your images for a slideshow on a Bongo4U website. There are two parts to this process: (1) select the slideshow that you want to add a new photo to and determine the photo size required for that slideshow; and (2) use Pixlr Express to resize and crop the image.
Part A – Determine the Required Photo Size
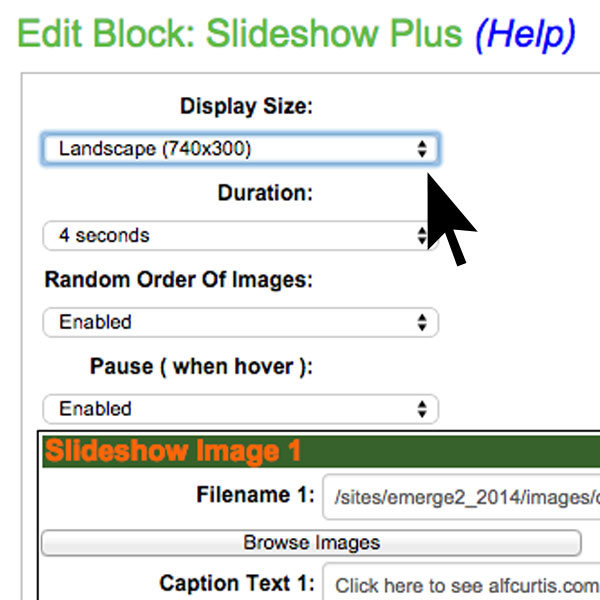
- If you have a Bongo4U site, login to its admin area, go to the page that contains the slideshow and click the “Block: Slideshow Plus” link.
- The size will be shown beside the “Display Size” prompt in brackets such as (740 x 300) or (960 x 300), etc.
- The first number is the required width of the image in pixels, the second number is the required height of the image in pixels. For example, in the above two examples the required width is 740 or 960, and the required height is 300 pixels in both examples.
- Write down the required width and height.
- Do not change this size.
Part B – How to Use Pixlr Express to Resize & Crop Photos
For these instructions we will assume a required width and height of 740 x 300.

In Pixlr:
- Go to Pixlr Express at address http://apps.pixlr.com/express/
- Click Browse to see photos on your computer, locate the photo that you wish to prepare for your website, click the image, click Open
- Click Adjustment
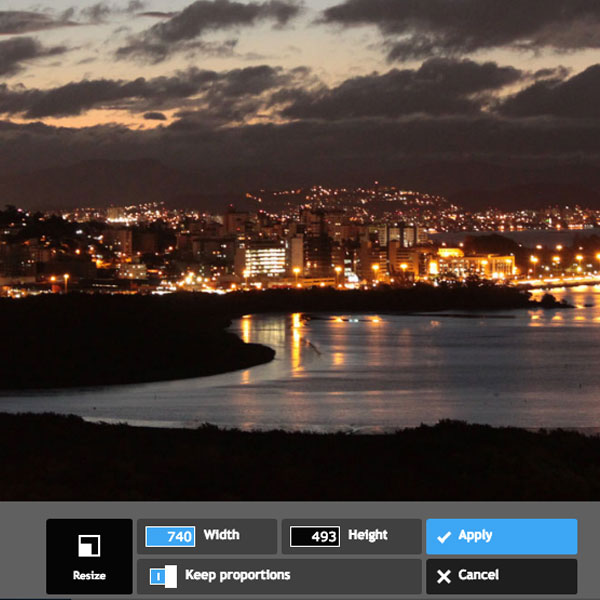
- Click Resize
- Remove the default number from the “Width” field and enter the required width (e.g. 740). You will notice the Height field will adjust relative to the width. (If your height is not adjusting to the width then “Keep proportions” may be turned off (grey “0”). Click “Keep proportions” to turn it on (blue “1”), empty the Width field and re-enter the required Width again – the Height field should now be automatically populated.)
- Click Apply
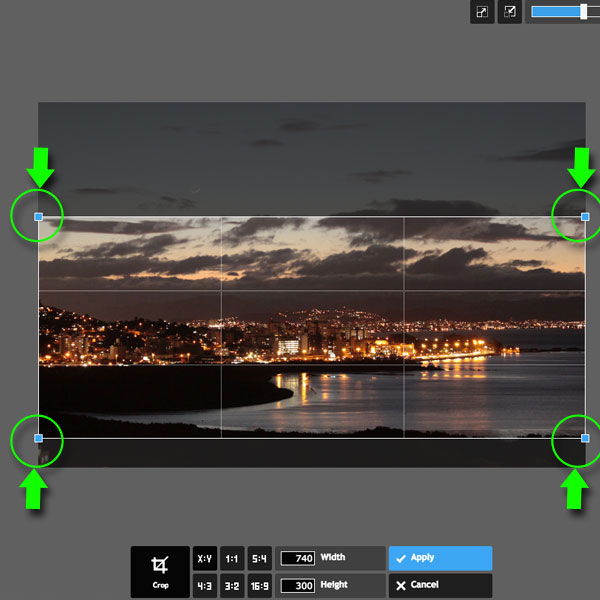
- Click Crop – Notice the Width and Height are displayed at the bottom.
- Drag blue squares in the corners up and down, but only up and down, to crop the height of the image (do not drag them left or right as it will change the width of your photo which you just resized to the proper width). You must move the blue squares up and down until the Height shown at the bottom is exactly equal to the required height. For example, if the required height is 300 pixels, then the Height must display exactly 300 (not 299, not 301).
- Click Apply
- Optionally, if you want to experiment with the “Auto Fix” or “Sharpen” other other features, do this now.
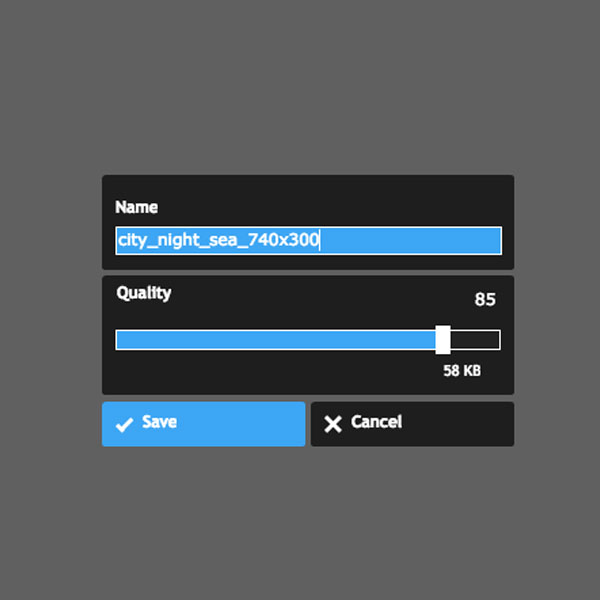
- Click Save
- Always change the image filename to include photo size, do not over-write the original, large image filename with this smaller version. For example, if the original filename was “store_front.jpg” and you have just resized and cropped it to be 740 wide by 300 high, then append “_740x300” to the end of the original filename, making this example filename “store_front_740x300.jpg” (Note: the “.jpg” file extension might not be visible, which is ok.)
- Click Save
- This will open a window for you to specify the folder on your workstation to save the revised image into. Select the desired destination folder and click Save. The revised file will now be copied from Pixlr to your workstation.
Summary
Now you can begin updating your Bongo4U website with new photos to keep your customers up to date with what is happening with your business, while keeping your website functional, efficient and looking great.
Instructions on adding a new photo to a slideshow, or replacing an existing slideshow image, can be found here.
The above instructions can also be used to prepare other images for your website. You just need to determine the image size you want and then perform Part B above to prepare the image. It might take some trial-and-error to determine the desired image size for other areas of your website. For slideshows, it is easy since the size is set when the slideshow feature is added to the website. But for other photos, it depends upon the space available on the page you are working on. You might need to experiment with a few different sizes to see what looks best.
You can also download the free Pixlr Express Mobile App in the Apple Store and Google Play or use their Facebook App.
If you don’t want to use a web-based app, but would prefer to download an image editing tool to your workstation, then you could download the Pixlr Desktop program, or if you want something different, you could try IrfanView, which is a popular, free downloadable tool.
Disclaimer: Emerge2 does not endorse or recommend Pixlr, or any other service or program mentioned here. Your results may vary. Make your own determination of applicability to your needs, and use at your own risk.
Comments are closed.